
Snipping Tool in Windows 7|8
The Snipping Tool is a Windows 7 program that allows users to take a snippet of the computer screen. In previous tutorials we took screenshots and edited them with Paint. The Snipping Tool allows us to quickly and easily perform many similar functions. To begin this process, open up the Snipping Tool from the Start menu click Start Button > All Programs > Accessories > Snipping Tool

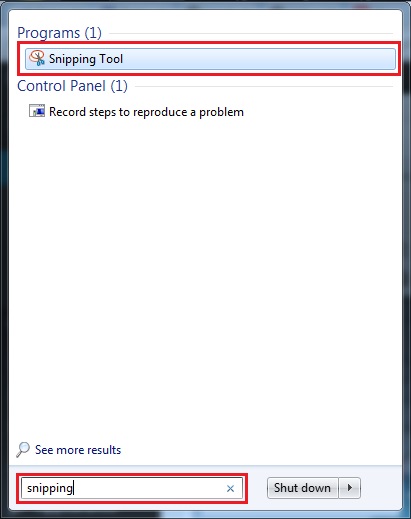
A second way is go to Start Menu > Search Box > type the word “snipping” > and click Enter
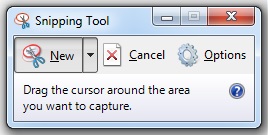
The window of the Snipping Tool application looks similar to the screenshot below.
The Snipping Tool allows you to take 4 different types of screenshots:
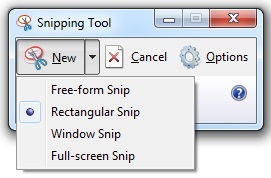
- Free-form Snip. Draw a free-form shape around an object.
- Rectangular Snip. Drag the cursor around an object to form a rectangle.
- Window Snip. Select a window, such as a browser window or dialog box, that you want to capture.
- Full-screen Snip. Capture the entire screen.
When you start the Snipping Tool, you can click or tap the Options button to set your preferences on how the program should work.
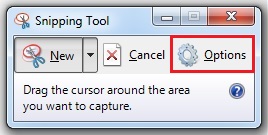
The available options are in two sections: Application and Selection.
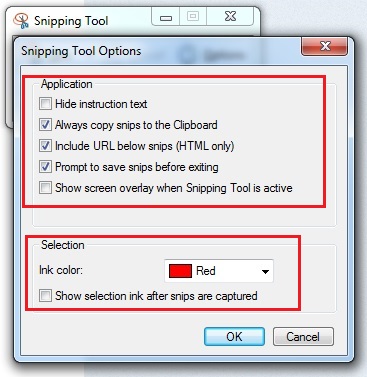
The Application section has a set of check boxes that enable you to make the following changes:
- Hide Instruction Text – hide the instruction text in the main Snipping Tool window.
- Always copy snips to the Clipboard – copy all captures to the Windows clipboard so you can paste them into other applications (e.g. Word processors or image editors).
- Include URL below snips (HTML only) – save your snips as a Single File HTML or MHT documents. If a snip is taken from an Internet Explorer window, it also shows the URL of the webpage included in the screenshot.
- Prompt to save snips before exiting – gives you a heads up if you have any captures that you have not saved, prior to closing the program.
- Show screen overlay – if disabled, when you are taking a screenshot, the Snipping Tool transparent overlay is no longer shown on the screen.
The Selection Options, allows you to make a few settings regarding the color palette :
- Ink Color – changes the color of the selection border when you create a snip.
- Show selection ink after snips are captured – when enabled, the selection border is shown around the snip, using the color selected in the‘Ink Color’ list.
After you capture a snip, it’s automatically copied to the Clipboard and the mark-up window. From the mark-up window, you can annotate, save, or share the snip. The following procedures explain how to use Snipping Tool. Once you click, a white film covers the screen and a toolbar appears. The mouse cursor changes to a crosshair. looks similar to the screenshot below.
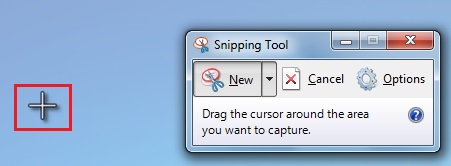
Determine what area of the screen you wish to save. Then click the cursor in one corner of that area. Holding down the mouse button, drag the cursor to the opposite corner of the area. Once you release the mouse button, the Snipping Tool shows you your snip.

The toolbar’s buttons give you several options for using and editing the snip. Once you are satisfied with your snip, you can either save it as an image file, email it to someone, or copy/paste it into another file.
Usage Options
| The New button discards the current snip and lets you create a new one. | |
| The Save button lets you save the snip as an image file. The file types available are PNG, JPEG, GIF, and MHT. | |
| The Copy button copies the image to the computer’s clipboard. This lets you paste it into other applications, such as Word, PowerPoint, or Excel. | |
| The Send button allows you to send the image in an email. Clicking the button inserts the snip into the body of a new email. Clicking the down arrow to the right of the button gives you the option of sending the snip as part of an email or as an attachment in an email. |
Editing Options
| The Pen Colors button allows you to choose different pen colors for writing or drawing on the snip. | |
| The Highlighter button turns the cursor to a highlighter for adding highlighting to your snip. | |
| The Eraser button turns your cursor to an eraser, thus allowing you to erase any marks added through the pen and highlighting features. |
Now that you know how to use the Snipping Tool, the coast is clear for you to take great looking screenshots. If you have any questions or tips to share, feel free leave a comment.
Thanks, If you like this tutorial please share this article to your friends in FB, Twitter,
Related Posts


About The Author
AYYU
I am a blogger since 2010 and I’m the author of this website I'm a systems/network administrator and I enjoy solving complex problems and learning as much as I can about new technologies. I write tutorials based on my work experience and other IT stuff I find interesting. since 2006 in online world also I am a troubleshooter for the well-known website like http://www.fixya.com and many more groups