
EXCEL 2016 BASICS CHAPTER 10
In this tutorial i will cover Basics of excel 2016 like Mathematical operations on date and time, Formatting date and time, Saving files, Recovering files, Print Preview.
Mathematical operations on date and time
You can perform such arithmetic operations as addition or subtraction not only on numbers but also on dates. In this lesson, I will show you a few examples of how you can do it.
Calculating the number of days between two dates
Example 1:
If you want to perform addition or subtraction on dates, first, you need to save them in separate cells. Let it be cell A1 and cell A2.
A1 = January 10, 2014 15:15:00
A2 = February 12, 2014
When a date includes time other than midnight (24:00:00 is the default time) then the number of days that are returned will be reduced by one. The following examples show ways to ignore time and use only the date part.
Example 2:
= DAYS(A2, A1)
returns 33.
In this example, the DAYS function returns the number of days between two dates.
Example 3:
= INT(A2) - INT(A1)
returns 33.
The date and time were rounded to the nearest integer (in this case, it means getting rid of the time part, so only a day will be remembered. The time will be set to the default value, which is 24:00:00).
Adding and subtracting days
Let’s use the example from the previous exercise.
Example 4:
A1 = January 10, 2014
If you want to see what date will be 33 days after the date of January 10, 2014, you can add to that date the number 33.
Look at the following formula:
= A1 + 33
The result will be February 12, 2014. You can also check what date was 33 days before the date of February 12, 2013.
A2 = February 12, 2014
= A2 - 33
The result is January 10, 2014.
Formatting date and time
You can format date and time in many different ways. Look at the following example to learn how to do it.
Example 1:
Put the following date inside a cell: February 14, 2014 18:15:00. Right-click the cell, and then select Format Cells….
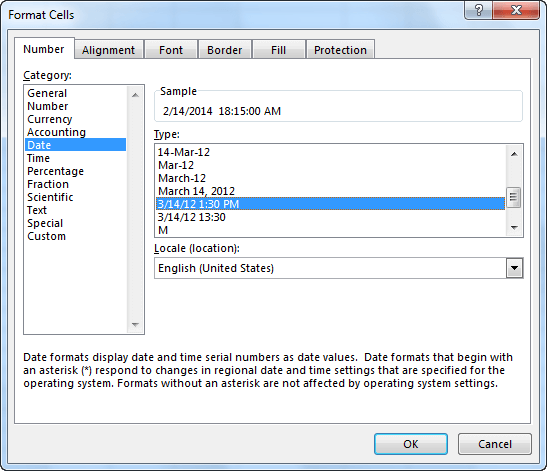
In the Format Cells window, the Number tab consists of four parts: Category, Sample, Type and Locale (location).
Click the Date position inside the Category box. On the right side, inside the Type box, different types of date and time formatting options will be displayed. Click one of them and then in the Sample box you will see the preview of the currently selected date, with the new formatting applied.
Create your own date and time formats
There is a large number of combinations when it comes to date and time formatting, but sometimes you won’t find any that meets your expectations. In such situations, Excel will let you create your own format that you can use later when working in Excel.
Example 2:
Click the cell again and then open the Format Cells window. Choose the Custom item, which is located at the bottom, in the Category field.
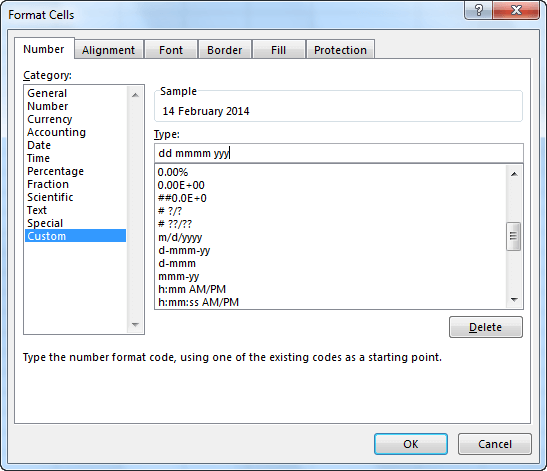
You can format date and time by using many different combinations. In the table below, you can see which letters corresponds to which type of formatting.
For Date:
| RESULT | FORMAT |
| Years: 00-99 | y |
| Years: 1900-9999 | yyy |
| Months: 1-12 | m |
| Months: 01-12 | mm |
| Months: Jan-Dec | mmm |
| Months: January-December | mmmm |
| Months: F-D | mmmmm |
| Days: 1-31 | d |
| Days: 01-31 | dd |
| Days: Mon-Sun | ddd |
| Days: Monday-Sunday | dddd |
For Time:
| RESULT | FORMAT |
| Hours: 0-23 | h |
| Hours: 00-23 | hh |
| Minutes: 0-59 | m |
| Minutes: 00-59 | mm |
| Seconds: 0-59 | s |
| Seconds: 00-59 | ss |
| Time: 10 AM | h AM/PM |
| Time: 10:36 AM | h:mm AM/PM |
| Time: 10:36:24 A | h:mm:ss A/P |
| Time: 10:36:24.75 AM | h:mm:ss.00 |
Save files
In Excel, you can save your files in a few different ways:
- By Save and Save As buttons, which are located under the FILE tab.
- Using Share and Export buttons.
- By Ctrl + S keyboard shortcut.
If you try to close Excel, but you haven’t saved your data, Excel will ask you whether you really want to close the application without saving.
Places where you can save your files:
Computer
User’s computer disk is the most popular place to save files. When you click the Computer button, you will find on the right side, the Current Folder and a list of the recently used folders.
Click the Browse button (or double-click the Computer button) to open the Save As window and save the file.
TIP
If you want to set the default path where you want your files to be saved, you can do it in FILE >> Options >> Save >> Save workbooks >> Default local file location.
SkyDrive
The SkyDrive is a cloud in which you can store your data. The advantage of this solution lies in the fact that you can access those files from any computer with Excel and Internet connection.
Office 365 SharePoint
The SharePoint Server is a web-based platform, which was created by Microsoft, primarily for small and medium-sized enterprises.
The server can be located in the company, where you can use it to share your documents with your group.
Saving with backward compatibility
If you open an old Excel (97 – 2003) file with the xls extension, Excel 2007 or newer will open this file in the Compatibility Mode, informing you about it in the file name.

The standard Excel files, since 2007 version are saved with the xlsx extension. However, there might be a situation that you don’t know whether someone who will use your file has Excel 2007 or newer installed.
In this case, you can save the file in a version that is compatible with Excel 97 – 2003. To do this go to FILE >> Save As >> Computer. The Save As window will appear. From the Save as type drop-down menu, select Excel 97 – 2003 Workbook (*.xls).
Saving Files as PDF
Before Excel 2007, saving PDF files was a bit more complicated. If you wanted to save your file, you had to install one of the PDF applications.
It could be a commercial Adobe Acrobat or one of the free alternative: Foxit PDF Creator or CutePDF. Then you had to print the file to PDF instead of a printer.
Since Excel 2007 you can save PDF file as easily as normal xlsx. If you want to save the file to a pdf format you need to choose PDF (*.pdf) from the Save as type dropdown menu.
Recover files
Probably you’ve had to deal with a situation in which you forgot to save the file you have worked a long time.
Maybe you chose the wrong button when a program asked you whether you want to save the file. Maybe it was a power failure or simply a system crash.
There may be many possibilities, so in Excel 2010 Microsoft introduced the feature called AutoRecover. It works in a way that a document is automatically saved every few minutes. This operation is performed in the background, so you don’t even need to be aware of this.
The AutoRecover feature works on two levels:
- The copies of the file are automatically created. You can browse them later.
- The file that has been closed without saving is saved as a draft.
Recovering the file that was saved automatically
Let’s suppose that you removed data, which later turned out to be important. You can’t go back by using the Undo (Ctrl + Z) button because you have exceeded the limit of 100 changes. In this situation, the best solution will be to return to the file that was automatically saved by Excel.
You can do this by selecting FILE >> info. To the right of the Manage Versions button, you can find a list of files and information when these files were saved.
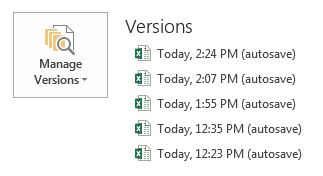
If you select one of them, Excel will automatically open it in a new window. You can copy cells that you need or restore the file to the newest state with the button which is located above the working area of the document.
Configuring the AutoRecover
By default, Excel creates a backup file every 10 minutes. You can change this value in FILE >> Options >> Save >> Save workbooks. Here, you will find the position Save AutoRecover information every. Change the number to one that suits you. This number may be between 1 and 120.
Print preview
When you finish working on your project and you want to print it on paper, you can do it by opening the Backstage View in FILE >> Print or using the Ctrl + P keyboard shortcut.

In the upper left corner, you will find the Print button. When you press it, the document will start printing. Next to this button, you can set how many copies of the document should be printed.
Printer
Here, you can choose the printer you want to use. It can be a standard printer, fax, Microsoft XPS Document Writer, or other, depending on the software installed on the computer.
Settings
In settings, you have access to the range of options from the drop-down menu. You can select which part of the workbook you want to print. By default, it is set to Print Active Sheets.
You can change it to Print Entire Workbook or Print Selection. In addition, you can set whether to sort the pages, choose portrait or landscape orientation, set margins and set the size of the print paper.
Print Preview
On the right side of the window, you will find the print preview. If you print more sheets or the sheet doesn’t fit on a page, you can choose which pages should be printed.
In next tutorial i will Write about Functions of excel 2016 Hope that it helps for you guys.
Related Posts


About The Author
AYYU
I am a blogger since 2010 and I’m the author of this website I'm a systems/network administrator and I enjoy solving complex problems and learning as much as I can about new technologies. I write tutorials based on my work experience and other IT stuff I find interesting. since 2006 in online world also I am a troubleshooter for the well-known website like http://www.fixya.com and many more groups