
How to Configure Server Based Network Guide
Getting TCP/IP working with DNS
Often on the forums I’ll see requests for help by people who are attempting to setup local domain based networks, meaning…they have a server that they wish to run as a DC (Domain Controller), and have a proper client/server based network. Prior to Windows 2000 Server, with Windows 2000 Professional or higher clients, the network would still function relatively well even if the protocols and services were setup rather loosely. People often used NetBEUI on the server and Win9X clients, and “it would work”. Even with just TCP/IP, name resolution often worked enough. Back then DNS was often really just used for resolving internet address, not for local network resolution.
With 2000 and higher…the focus shifted more on DNS. With Win2K and higher, DNS is now used for local network resolution. When running a domain, it’s important to have this setup correctly.
Setting up the Server
I’ll assume a typical setup in this example, behind a basic NAT router (which is what more and more small businesses are using). Screenshots are from my home setup, myrouter has a LAN IP address of 192.168.69.1, and currently it’s the gateway for my network. My Microsoft Small Business Server 2003 is 192.168.69.11. It’s running as mydomain controller, therefore it’s running DHCP, DNS, and WINS…amongst other things. SBS (Small Business Server) installs the WINS service by default, however vanilla server users need only install the WINS service if they run Windows 9X clients…as Win9X needs that for optimal name resolution (rather than utilizing DNS for that). If you’re only running 2K or higher clients on basic setups, don’t worry about installing WINS.
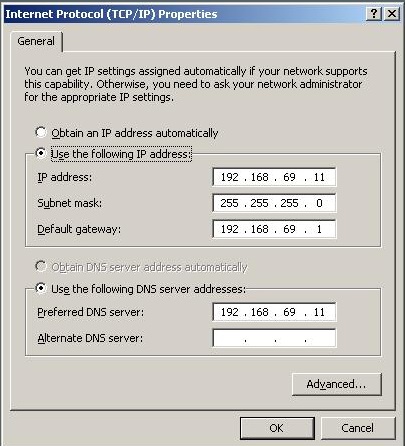
When building a server, I like to setup the TCP/IP upon first desktop login…before continuing with the “Configure Your Server” wizard, which basically kicks off DCPROMO. Here’s where you choose your domain name, such as the default “mydomain.local”. I choose the “.local” instead of .com or whatever due to various factors which would be material for another article. The server should look at itself for DNS, and if it’s running WINS…should also look at itself for WINS. Nothing else. In my home example:
| Servers IP address | 192.168.69.11 |
| Servers subnet mask | 255.255.255.0 |
| Servers Gateway | 192.168.69.1 |
| DNS | 192.168.69.11 |
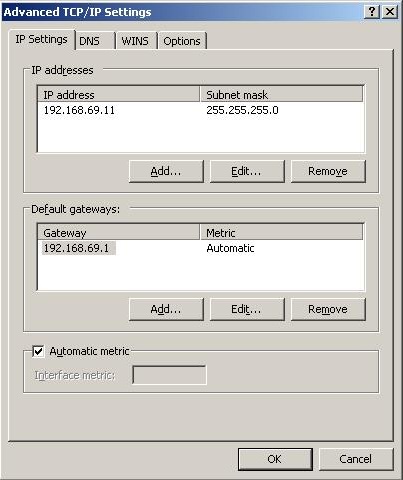
| WINS | 192.168.69.11 |
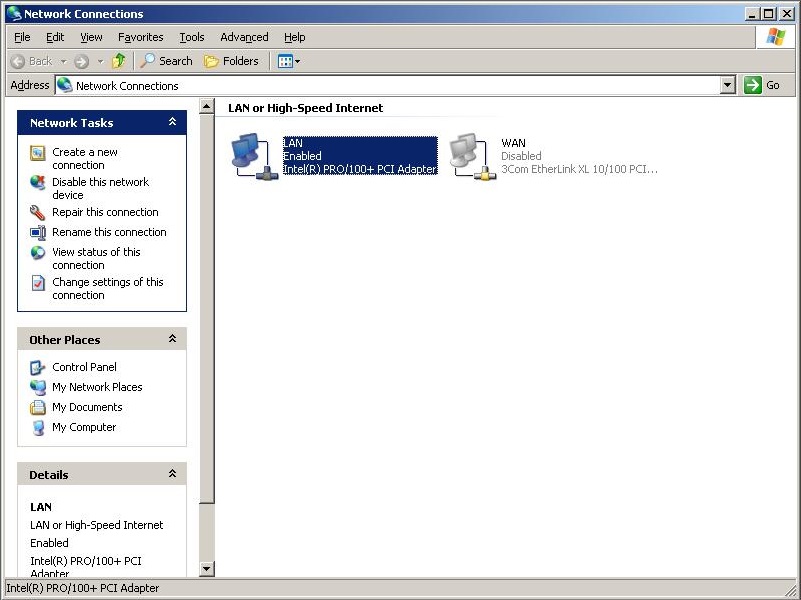
Right-click “My Network Places”, select “Properties”. Right-click “Local Area Connection”, select “Properties”, double-click “Internet Protocol TCP/IP”
Click on the “Advanced Tab” to get to WINS
If you have any additional member servers on your network, like a server that’s running Exchange, or file storage or something else…they should look at your DC for their DNS and WINS (if used). Example:
| ServerBs IP address | 192.168.69.12 |
| ServerBs subnet mask | 255.255.255.0 |
| ServerBs Gateway | 192.168.69.1 |
| ServerBs DNS | 192.168.69.11 |
| ServerBs WINS | 192.168.69.11 |
Now, lets finetune your DNS service properties on your DC. What you want to do is find out what your ISPs two DNS servers are. Several ways of finding this out, check your ISP’s support pages, or any documentation they sent you, or call up their tech support. Or perhaps the quickest and most accurate, log onto your router, head for the status section, look under the WAN status…you’ll find them there. ISPs rarely change DNSservers, but once in a while it can happen due to a buyout or big overhaul. It might be a good idea to check on this once in a while to make sure you still have the correct DNS servers being used. Now that you found out what your ISPs two DNS servers are, you enter them into the forwarding section of your DNS service properties.
To get there, open up your Microsoft Management Console (MMC). Several ways of getting there: Start > Server Management. Or right-click “My Computer” and select “Manage”. Or Start > Programs > Administrative Tools > DNS. You drill down through the services to get to your DNS service, right-click the DNS object, select Properties, and you’ll see the “Forwarding” tab there.
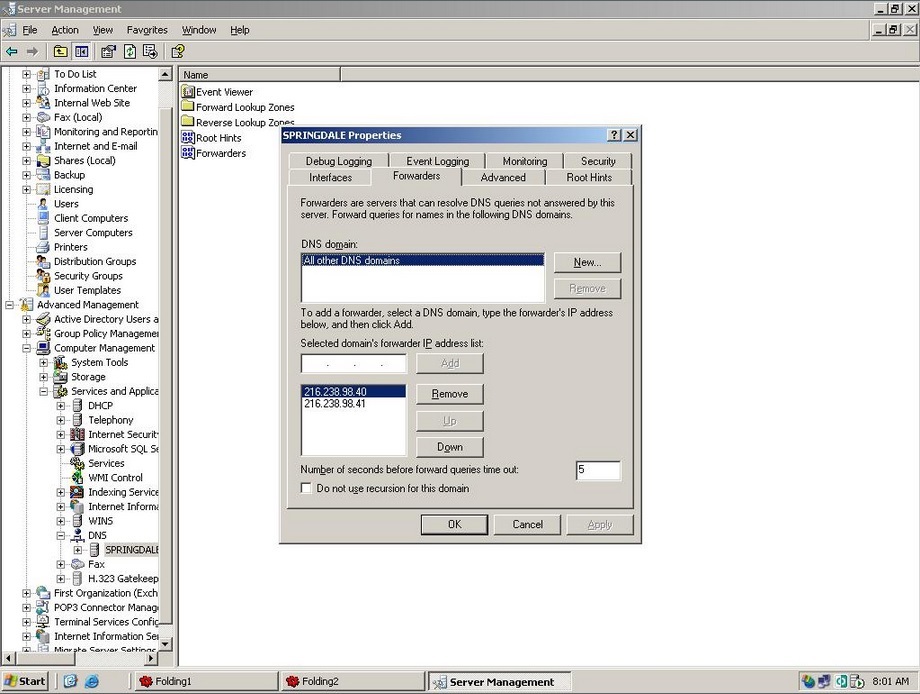
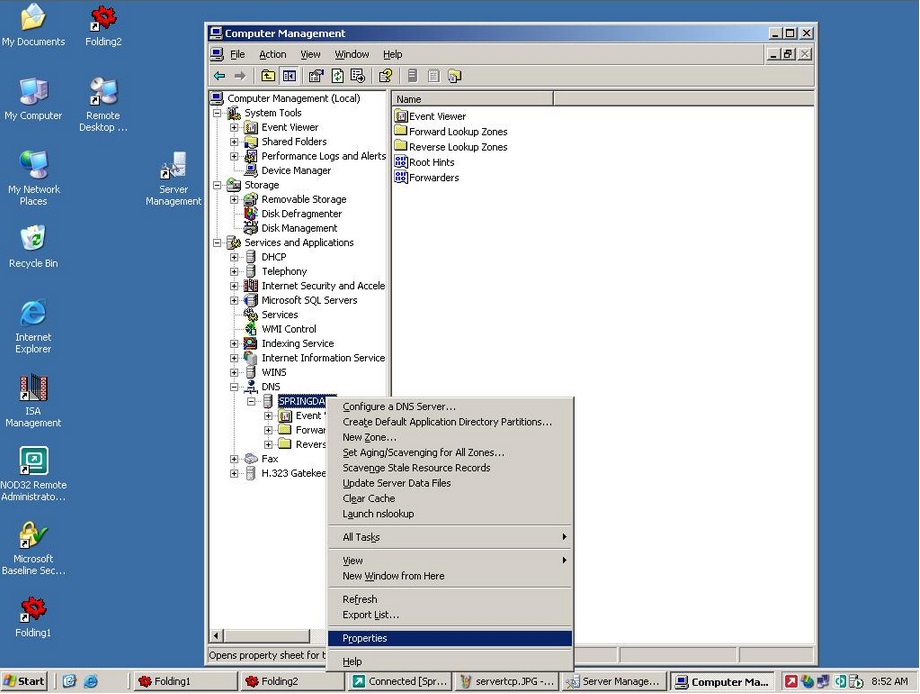
The theory is adding your ISPs DNS servers as forwarders, is that any requests that your DC gets which it does not know (such as websites)…it will turn around and ask the DNS servers which you entered here. Your ISPs DNS servers are usually just one hop away, so they’ll reply faster…in theory. If you have special hosting done elsewhere for web and/or POP e-mail, you can enter that hosts DNS servers here also or instead.
Now…for the clients on your network. Similar to your server(s), they should look at your DC as their one and only DNS server. Whether you hand out addresses using DHCP, or manually assign them, you want to follow this rule. I prefer letting the DC run DHCP for the network, things just “work better” when you do that. By default, routers will have their DHCP enabled. By default, routers (depending upon model and firmware used) will hand out your ISPs DNS servers, or their own address and do DNS forwarding themselves. You don’t want this, you need your clients to get your DCs IP address as their one and only DNS server. Now many routers will allow you to edit their DHCP properties, you could edit that and enter your DCs IP for DNS and WINS, however, I prefer to let the Windows server do its job…after all…it’s a server, it should be boss of your network, and the DHCP service on a Windows server is supposedly more robust and reliable than the router. Clients should report into your servers DHCP service for optimal performance. Now the Windows DHCP service will stall out if it detects another device’s DHCP service running…so you should disable the DHCP on your router, then configure your server’s DHCP scope, authorize, and start it. I often do a client address pool starting at 100, and going up from there. That leaves me with .2 to .99 for static devices like servers, print servers, networked scanners, other “special network services”. So workstations should get the following info from DHCP:
| IP address | 192.168.69.100, 192.168.69.101, …102, …103, etc. |
| Subnet mask | 255.255.255.0 |
| Gateway | 192.168.69.1 |
| DNS | 192.168.69.11 |
| WINS | 192.168.69.11 (if applicable) |
| WINS node type | 0x8 Hybrid (if running WINS) |
And that should do it. You can create your domain user accounts, run Windows updates on your server, install your networked antivirus program, build your workstations, run their Windows updates, properly join them to the domain…oh yeah, lets take a quick peek at that.
Workstations Setup
Now that your server is ready, you want to take your Win2K or XP workstations, and properly join the domain. To do so, sitting at the workstation, right-click “My Computer”, select “Properties”. Click the “Computer Name” tab. “To rename this computer or join a domain click Change”… Rename the computer if you wish and reboot. Repeat process to this spot again, or if it’s named to your satisfaction, change the radio button from workgroup to domain, and enter your domain name, such as “mydomain.local”. You can even enter the shorted netbios name of your domain you put in when you ran DCPROMO. You will get a challenge for authentication, here’s where you enter the Domain Administrator’s account name and password (that you use to log onto the server), or enter an account you created with admin rights. It should give you a “Welcome to the blahblahblah domain” message if things were done correctly. It will prompt you to reboot. Pause for a minute – at this point I always change the local Administrator account password, so that it’s at least something, and not blank. Too many worms and viruses spread taking advantage of that account being left blank or weak. Your choice of what to make it, whether it’s the same as the domain admin one, or something else.. just make sure you know it, document it (can be the same across all workstations). Now reboot.
After a reboot, you’re then faced with Ctrl+Alt+Del – before you actually log in, click that new “Options Button” you see. If you click the drop-down arrow, you’ll (within a few seconds as it builds the list) see the domain listed. The first choice would be the netbios name of the computer you’re at. So you have a choice of 1) Local login, or 2) Domain Login. In pretty much most cases you’ll forever leave it at the domain login. The next step that I do is log into the domain using the domain Administrator’s account. I do this because I feel it’s the quickest way to add the domain users to the local admin group. It’s important to remember the difference between the “domain accounts/groups”, and the “local accounts./groups”. You’re pretty much all done with local accounts/groups…except for one more step, which is not necessary – just a personal preference I usually do.
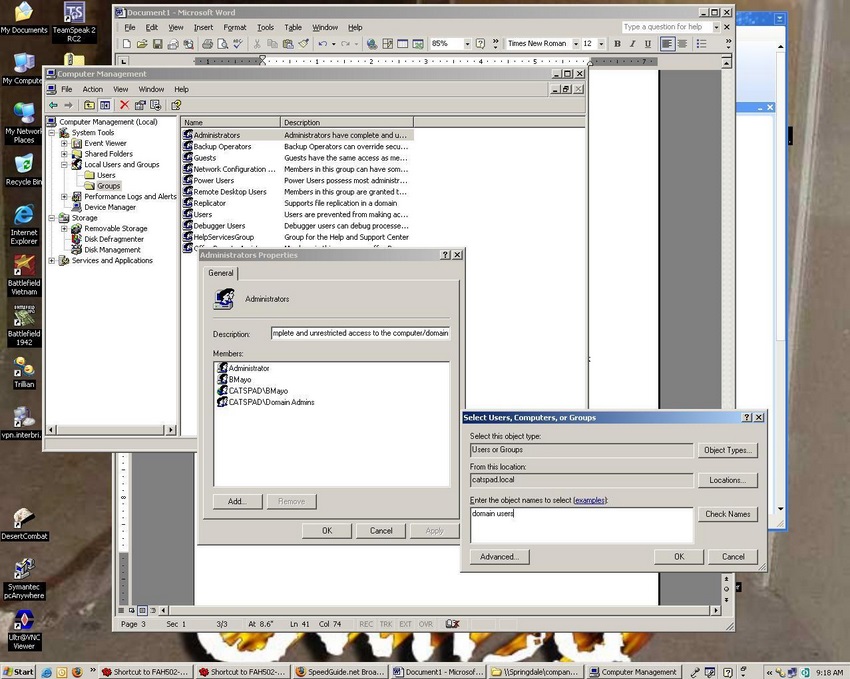
Having logged into the domain on this workstation as the domain admin, right-click “My Computer”, select “Manage”, navigate down the MMC to “Local Users and Groups”…Groups. This here is the local users and groups…which is separate from the domain users and groups. If your computer was used as a stand alone or in peer to peer mode before, you’ll have those user accounts listed here. But once we’re done with this next step, this will mostly never be used again since this computer is now part of a domain. I add the domain group “Domain Users” to the local “Administrators” group. This means that anyone having a domain account logging onto this workstation will have “local” admin rights. They can install software, install hardware, etc. Whether you choose to do this or not depends on your environment. Most of my small business clients are setup this way, and it can be different for the separate users, depending on whether they like to “play” with their workstations too much. If you don’t do this, to install most software or configure hardware, someone with domain admin rights will have to log onto the workstation. This may or may not work for you. Notice in the following screenshot, you’ll see the domain admins group has already been added to the local Administrators group, and I have already added my domain Catspad\BMayo account. You’ll also see an account that’s called just called BMayo – that is a local account which I never use, I just put it there to visually illustrate what a local account looks like, and a domain account.
Now you can log off as the domain Administrator, and log back into the domain under the user’s account. Being the first time that you logged in as that user, it will take a few seconds longer to “build the profile” in of C:\Documents and Settings\… then you boot up to a clean desktop, and proceed to configure as you wish.
Thanks, If you like this tutorial please share this article to your friends in FB, Twitter,
Related Posts


About The Author
AYYU
I am a blogger since 2010 and I’m the author of this website I'm a systems/network administrator and I enjoy solving complex problems and learning as much as I can about new technologies. I write tutorials based on my work experience and other IT stuff I find interesting. since 2006 in online world also I am a troubleshooter for the well-known website like http://www.fixya.com and many more groups