
UDDI Services setup Windows Server 2008

Accessing the UDDI
Start Eclipse if it is not already running. The first step is to start the Web Services
Explorer, so select this from the Run menu (Figure 2).
After a short time you will see that the Web Services Explorer opens in the main ‘editing’ area inside Eclipse. Click on the ‘UDDI Main’ node in the Navigator and you will be presented with the ‘Open Registry’ page, which can be used to access any UDDI (Figure 3). At this stage you may well wish to maximise the Web Services Explorer window in Eclipse, as this is used independently of other windows.
Notice that there is a range of six buttons at the top right-hand corner of the Web Services Explorer. These support rapid access to common operations that I shall cover shortly. If you hover the mouse over any button then you will see a ‘tool-tip’ message appear that describes the function of that button. The leftmost two buttons (left- and right-pointing arrows) operate in the same way as a typical web browser’s ‘Back’ and ‘Forward’ functions in moving through the historical set of pages that have been visited.

Figure 2 Launch the Web Services Explorer option on the Run menu

Figure 3 Web Services Explorer pane in Eclipse
The next step is to open the UDDI so that you can start interacting, either by searching for entries or by publishing. To open your own UDDI you need to enter the appropriate URL.
Earlier, in the introduction to T320 server accounts, I examined the jUDDI server pages. The URL for the jUDDI at the University and its enquiry interface is:
http://t320webservices.open.ac.uk/t320juddi/inquiry
Enter this URL for the UDDI into the ‘Inquiry URL’ field of the ‘Open Registry’ page and give the registry a name (Figure 4). Then click on the ‘Go’ button.

Figure 4 OU UDDI URL entered into ‘Open Registry’ page
After a time the UDDI should open and you should see your name for the UDDI listed in the Navigator panel. In the Status panel at the bottom, a message stating that the registry was opened successfully should be listed (Figure 5).

Figure 5 Web Services Explorer after opening UDDI
The ‘Registry Details’ page is typical of other pages you will see in the Explorer. There is an additional set of five buttons at the top right-hand corner of this page. These also provide rapid access to common operations that you might want to perform, given that you have opened the UDDI. Again, hovering over a button will display a tool-tip description of the button.
At the top of the page is a set of data items that relate to the subject of the page.
These consist of a ‘Registry Name’ and ‘Inquiry URL’.
At the bottom of the page is a set of ‘Other Actions’ links. These vary according to the page displayed and provide access to typical actions you may want to take, given the current context.
In the ‘Registry Details’ list of ‘Other Actions’ you will find an option called ‘Add to Favorites’. If you select this option then the jUDDI (‘My jUDDI’) will be added to the predefined pull-down list of registries under ‘Favorite Registry’ on the ‘Open Registry’ page that you saw in Figure 4. This means that if you return to the registry after closing Eclipse, you need only select the ‘My jUDDI’ option to fill the ‘Inquiry URL’ and ‘Registry Name’ fields.
The UDDI in the Navigator on the left can be expanded to reveal the children under the registry (Figure 6). Later, as you perform further actions, actual instances of items will be added under the four initial groupings.

Figure 6 Groups of items under UDDI in Navigator
The first item, ‘Executed Queries’, is used to hold the results of queries, such as searches for businesses or services, so that they can be referred to later. The query results are listed but are held only within Eclipse and not within the UDDI. The other three items group together the instances of the descriptions that have been published under three folders: business descriptions, service descriptions and service interfaces.
To publish in the jUDDI you must have a valid login and password. If you have set up your own jUDDI installation then when you ran the SQL script to create database tables you will have seen that users are created in the ‘PUBLISHER’ table. The SQL which does this is in the insert_publishers.sql file which has a statement similar to:
INSERT INTO PUBLISHER
(PUBLISHER_ID,PUBLISHER_NAME,EMAIL_ADDRESS,IS_ENABLED,IS_ADMIN) VALUES (‘jdoe’,’John Doe’,’[email protected]’,’true’,’true’);
To publish in the jUDDI, you need first to log in. At the bottom of the Actions panel there is a list of ‘Other Actions’ that includes a ‘Login’ link. Click on this link now. A ‘Login’ page will then appear in the Actions panel (Figure 7).
To log in you should type the URL that will be used for publishing items by Eclipse, your User ID and a password.
The ‘Publish URL’ for the OU jUDDI is:
http://t320webservices.open.ac.uk/t320juddi/publish

Figure 7 Web Services Explorer UDDI ‘Login’ page

Figure 8 Completed log-in credentials for user ‘nks34_C1158x’
A password is not actually required for you’re the jUDDI account as these are not actually implemented for login, so keep your User ID secret, but you can type in your User ID again (Figure 8).
After a time the log-in process will complete. You will see that you are logged in and that the jUDDI listed in the Navigator shows this (9). You will also see that a new ‘Find’ page is presented in the Actions panel and that a Status message is reporting that no businesses, services or interfaces have been found.

Figure 9 Web Services Explorer after initial log-in
Now that you are logged in, you can start to publish entries. Note that there is a possibility that you may become logged out, in which case you should see a message in the Status panel to this effect and should then log in again.
Publishing entries
Publishing a business description
You will start by publishing a business description to the registry. You can only publish a service if a business description exists that it can be associated with.
First switch to the ‘Publish’ action view by clicking on the ‘Publish’ shortcut, as shown in Figure 10 (you might also like to hover the mouse over the other shortcuts to determine their purpose). You will then see the ‘Publish’ page displayed in the Actions panel (Figure 81).
Enter a name and description for your business.

Figure 10 Shortcut button to ‘Publish’ page
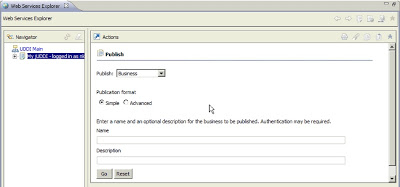
Figure 8 ‘Publish’ page in Actions panel
Once you have entered your business details (Figure 92), click on the ‘Go’ button to publish your business description.

Figure 92 Completed business details for publishing
You should then see a number of changes (Figure 103

Figure 103 Web Services Explorer after publishing business
The Actions panel will list ‘Business Details’ for the newly entered business and in the Status panel you should see a message reporting that the business was successfully published.
The business, named after your OUCU, will be listed under ‘Published Businesses’ in the Navigator. If in the future you want to return to the ‘Business Details’ page for this particular business, you can click on ‘Published Businesses’ in the Navigator and then click on the link to the business you want in the list of businesses.
If you examine the ‘Business Details’ page, you will see that it consists of a range of information under different headings. You have entered a very minimal set of information, which is listed under the headings that have information displayed underneath. These are (you may need to scroll down to see them all):
- the ‘Business Key’, which the registry has generated for you as a unique identifier for your business
- ‘Names’, where the single name for the business (here ‘nks34’) is listed
- ‘Descriptions’, where the short description of the business you gave earlier is listed
- ‘Discovery URLs’, which lists a single URL that on first sight seems incorrect. However, if you know that ‘t320webservices.open.ac.uk’ is an alias for ‘dotterel.open.ac.uk’ then this URL may be more easily understood. You will use this URL shortly.
Other headings have no associated information and are thus not expanded in the initial view of the business’s information. You can show or hide the information under a heading by clicking on the small arrow next to it.
The ‘Discovery URL’ given for my example business entry is:
http://dotterel.open.ac.uk/t320juddi/uddiget.jsp?businesskey=
D491C890-2CCB-11DD-B45C-A2BBF7B653B8
This points to the UDDI on the server I have just published to and then requests a Java Server Page (JSP) called ‘uddiget.jsp’, passing over the businesskey value to the page. The JSP provides a set of basic functionality so that given a key value (businesskey, servicekey, bindingkey or tmodelkey) it will return an XML document describing the entry identified by the key.
So, if you type your own ‘Discovery URL’ into a browser then you can check that your entry has been published. Figure 114 demonstrates the result using the example above. (Please note that some problems have been identified with displaying the XML in some versions of the Firefox browser.)

Figure 114 businessEntity description retrieved from jUDDI
Publishing services
Having published a business, you can now move on to publishing one or more web service descriptions that are associated with the business description.
At the bottom of the ‘Business Details’ page is a list of ‘Other Actions’ you can take, which are generally useful after publishing a business description. Select the ‘Publish Service’ link so that the page in Figure 5 is shown.

Figure 15 ‘Publish Service’ page
Now you need to refer back to your earlier deployment of the ‘Hello’ web service. The essential item you require is the URL to obtain the service’s WSDL description.
When we deployed the service we saw that the WSDL was at:
http://t320webservices.open.ac.uk/axise_nks34_axis2_A11581/ services/HelloService?wsdl
So enter your own service’s URL and complete the ‘Name’ and ‘Description’ fields (Figure 126). Notice that I have used a personal identifier as the initial part of the service name so that I can easily distinguish it from other services. This is generally good practice in a public UDDI.

Figure 126 Completed ‘Publish Service’ fields
Then click the ‘Go’ button. After a short time you should see the Web Services
Explorer change to display similar information to that shown in Figure 137.

Figure 137 Web Services Explorer after publishing ‘Hello’ service
The information displayed is much the same as for the earlier business (with a key etc.) but, of course, relates to a service.
If you examine the Status pane you will see that as well as a service, a ‘Service interface’ was also published.
What you may not have realised is that Eclipse has actually accessed the service WSDL to gather the information to create the service interface. If your service is not deployed to access and the WSDL is not available then you will see an error message.
The information from the service’s WSDL, together with the WSDL URL, is used to create a service interface. To view the service interface you can click on it under ‘Published Service Interfaces’ (it will be of the form ‘http://t320.open.ac.uk’) and then, if necessary (depending on your previous actions), click on the ‘Details’ button (the leftmost button in the set in the corner of the Actions pane).
The details of the service interface are shown in Figure 148.

Figure 148 ‘Service Interface Details’ page
Alternatively you can issue a search query for interfaces. To do this you can, for example, click on the service in the Navigator (and then on the ‘Details’ button if necessary) to view the ‘Service Details’ page. Then, from the ‘Other Actions’ list at the bottom of the details, select ‘Get Service Interfaces’. A ‘Query Results’ page will be displayed listing the service interfaces found (Figure 191519).
You will notice that in this case, the service interface is actually listed three times. Presumably this behaviour is due to the same interface being found by listing items of type ‘interface’, by listing service interfaces and by listing business interfaces. Click on any one of the listed items to display the same details (Figure 148).
On the ‘Service Interface Details’ page, notice that the service interface lists a tModel key value. So we know that a tModel has been created in the jUDDI database. Infact it seems that the Eclipse web service explorer simply terms tModels as ‘Service Interfaces’ which simply include the information we can expect in a tModel. Later in this guide you will learn how t use another tool, the ‘jUDDI Console’ to view UDDI entries. You can then take the Service Interface’s tModel key and use this to view the actual tModel itself.

Figure 1915 Result of search for service interfaces
Before moving on notice that the list of ‘Other Actions’ at the bottom of the main panel now contains typical related actions and other actions specific to the service interface such as ‘Unpublish Service Interface’.
Related Posts


About The Author
AYYU
I am a blogger since 2010 and I’m the author of this website I'm a systems/network administrator and I enjoy solving complex problems and learning as much as I can about new technologies. I write tutorials based on my work experience and other IT stuff I find interesting. since 2006 in online world also I am a troubleshooter for the well-known website like http://www.fixya.com and many more groups
No Comments