
Useful System Tools Hidden in Windows part 1
Windows Memory Diagnostics Tool
If Windows detects possible problems with your computer’s memory, it will prompt you to run the Memory Diagnostics Tool. When you receive a notification about a possible memory problem, click the notification to choose between two options for when to run the Memory Diagnostics Tool.
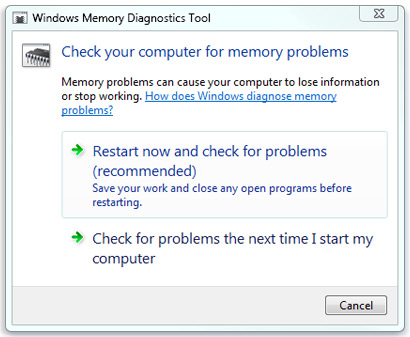
If you choose to restart your computer and run the tool immediately, make sure that you save your work and close all of your running programs. The Memory Diagnostics Tool will run automatically when you restart Windows. It might take several minutes for the tool to finish checking your computer’s memory. Once the test is completed, Windows will restart automatically. If the tool detects errors, you should contact your computer manufacturer for information about fixing them, since memory errors usually indicate a problem with the memory chips in your computer or other hardware problem.
To run the Memory Diagnostics Tool manually you can flow these steps
1. To Start from within Windows 7
A) Open the Control Panel (icons view).
B) Click on the Administrative Tools icon, and click on Memory Diagnostics Tool.
C) Go to step 1F below. OR
D) Open the Start menu.


2. To Start from Windows Boot Manager
A) Boot into the Advanced Boot Options screen.
B) While in the Advanced Boot Options screen, press the Escape (Esc) key. (See screenshot below)

C) While in the Windows Boot Manager screen, press the Tab key. (See screenshot below)

D) With Windows Memory Diagnostics selected, press Enter. (See screenshot below)

E) Go to step 4.
3. To Start from System Recovery Options
A) Boot into the System Recovery Options screen.
B) Select the Windows Memory Diagnostic Tool option. (See screenshot below)

 4. The computer will now restart, and you will see this screen next. (See screenshot below.
NOTE: Windows Memory Diagnostic Tool will run the Standard test by default.

A) Go to step 6.
A) Press F1. (See screenshot above)
NOTE: If you have a multimedia keyboard, then you may need to press the Function (F-Lock) key for F1 to work.
B) Press the TAB key to switch between the option categories, and use the arrow keys to select the option. (See screenshot below)

NOTE: Press the Escape (Esc) key if you do not wish to make any changes to the options and return to the screen below step 4.
7. You can also read the Memory Diagnostic Tool system log in Event Viewer.
In next tutorial i will write about another hidden tool in windows Resource Monitor
picture credit goes to seven forums and micros soft
Related Posts


About The Author
AYYU
I am a blogger since 2010 and I’m the author of this website I'm a systems/network administrator and I enjoy solving complex problems and learning as much as I can about new technologies. I write tutorials based on my work experience and other IT stuff I find interesting. since 2006 in online world also I am a troubleshooter for the well-known website like http://www.fixya.com and many more groups
I’m looking for blogs that have already fantastic tips about what’s in fashion and how much the most excellent makeup is..