Windows Server Proxy Server Introduction and Setup Steps
- Keep clients behind it so that they can surf anonymous, it’s mostly for security. Fox example, if a client visit yahoo via a Windows server proxy server, yahoo will get a request from this proxy server but not this client which makes it difficult for yahoo to track this client.
- Sharing Internet connection with your friends and colleagues. With a Windows server proxy server, computers can get access to the Internet, it’s a good solution for Internet connection sharing and makes saving for Internet connection fees.
- Speed up clients’ surfing. All requests from clients will reach the proxy server at first. If the proxy server has cached the resources, clients will get feedback directly from it, this will be more quickly.
- To circumvent regional restrictions. For example, a server using IP-based geolocation to restrict its service to a certain country can be accessed using a Windows server proxy server located in that country to access the service.
- Make you able to access blocked websites. For example, many work offices and schools have blocked facebook, myspace, youtube and some other websites. Fortunately, with the help of a Windows server proxy server you can bypass such restrictions easily.
II. Windows Server Proxy Server Setup Steps
CCProxy is an easy-to-use proxy server software based on Windows, it is compatible with both Windows Server 2003 and Windows Server 2008. The recommended Windows version are Windows Server 2003 Enterprise Edition with SP2 and Windows Server 2008 R2, both 32 bit and 64 bit are supported by CCProxy.
CCProxy provides 3-user free version for personal users and home users to build their own windows server proxy server efficiently and easily, bellow is a step by step instruction for you.
Before proceeding, let’s say that you want to build a Windows server proxy server with LAN. If you want your proxy server available for clients over Internet, please just refer to this article of Internet free proxy server.
Step 1 – Preparation for Windows server proxy server setup
- Install Windows Server 2003 Enterprise Edition with SP2 or Windows Server 2008 R2 on a pre-selected computer.
- Make sure this computer is able to access Internet directly.
- If you have enabled the Windows system firewall or have installed some other security software, please make sure the bellow ports are available.
HTTP: 808
FTP(Web): 808
FTP: 2121
Gopher: 808
Secure/SSL/HTTPS/RTSP: 808
SOCKS/MMS: 1080
News(NNTP): 119
SMTP: 25
POP3: 110
Telnet: 23
These are the default ports of CCProxy, you can change them as you wish according to the actual needs. - Make sure that all clients within LAN are able to access the Server.
Step 2 – Install CCProxy on the computer that will run as Windows server proxy server
- Suppose the server IP in the LAN is 192.168.0.1, and then 192.168.0.1 is the proxy server address.
- You can download CCProxy here. Run ccproxysetup.exe and follow the on-screen instructions to install CCProxy.
- Run CCProxy on the server (Figure 1).
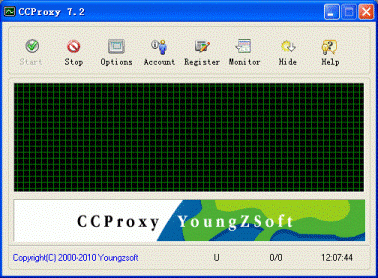 (Figure 1)
If you get problem in launch CCProxy, please refer to “CCProxy Start Problem“.
Step 3 – Add client’s IP into CCProxy on your Windows server proxy server
- Choose one computer in the LAN that needs to access the Internet. Suppose the IP address of the computer is 192.168.0.2.
- Open CCProxy main window, click “Account” button, then popup “Account Manager” dialog box.
- Select “Permit Only” in “Permit Category” and select “IP Address” in “Auth Type” (Figure 2).
- Click “New” button, fill “192.168.0.2” in the “IP Address/IP Range”, click “Save” and “OK” button (Figure 3, Figure 4).
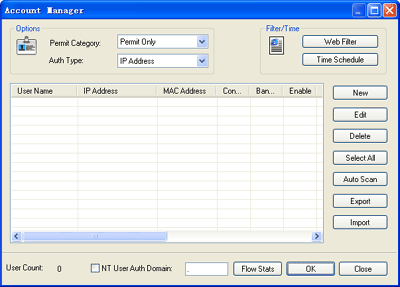 (Figure 2)
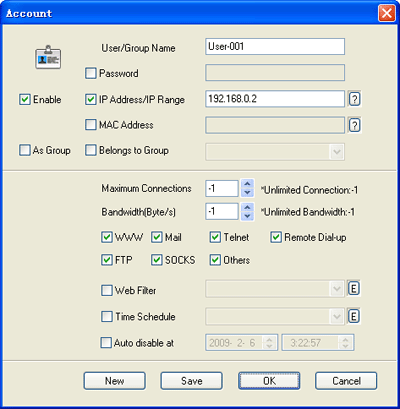
(Figure 3)
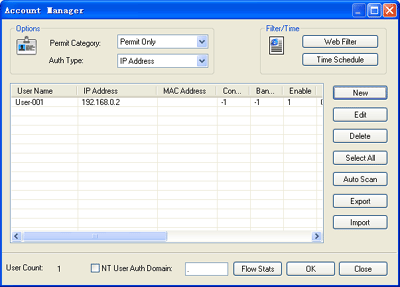
(Figure 4)
Step 4 – Make proxy server settings for IE on client
- Go to client computer and open IE window.
- Open “Tools” menu, select “Internet Options” and open the “Internet Options” dialog box.
- Select “Connections” tab (Figure 5), click “LAN Settings” button and open the “Local Area Network(LAN) Settings” dialog box.
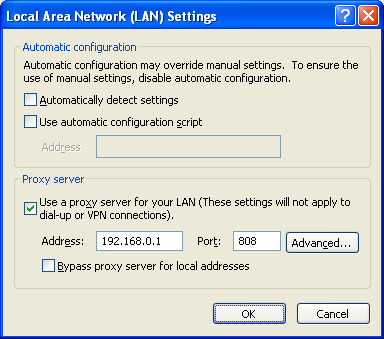
- Check “Use a proxy server for your LAN”, Fill “192.168.0.1” in “Address” and “808” in “Port” (Figure 6).
- Click “OK” button in “Local Area Network (LAN) Settings” and “Internet Options” dialog boxes.
- Now you can browser Internet web sites in IE at the client.
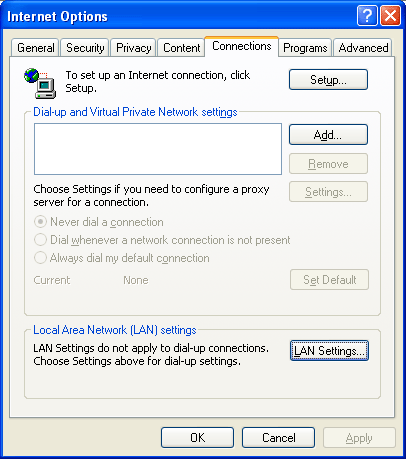 (Figure 5)


I believe this is among the such a lot important info for me. And i am satisfied studying your article. However should statement on some common things, The web site style is great, the articles is truly nice : D. Good process, cheers
Hello! I simply want to give you a big thumbs up for the great information you’ve got here on this post. I’ll be returning to your site for more soon.