
How to delete a duplicate files automatically
Duplicate-file-finding programs expect you to manually check each file for deletion. That’s not practical for Edward Derbyshire, who has “121,000 duplicates” to delete.
Before I tell you how to delete all of your duplicate files automatically–without checking each one first–let me give you a warning: Doing so requires you to let software make decisions best left to you. Are the files really duplicates? Is there a good reason for that file to be in two different locations? And if not, in what folder should the file reside?
So before you go the automated route, consider a safer option: Set your duplicate file finder to ignore files smaller than 20MB. That way, you’ll have far fewer files to worry about, yet still free up a lot of space.
If you use Digital Volcano’s Duplicate Cleaner Free , you’ll find that option under File Sizes on the Search Criteria tab. Uncheck Any Size and enter 20000 in Minimum File Size field. If you still want the program to automatically select files to delete, use your duplicate file finder’s automatic selection tool. Here’s how to do that in Duplicate Cleaner–Free or Pro:
First, make sure you only get true duplicates. In the Search Criteria tab, check both Same Content and Same File Name.
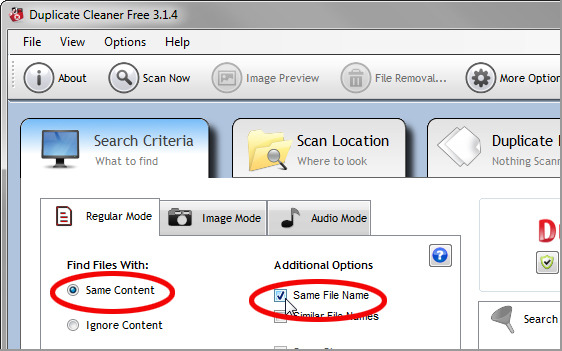
And make sure that Don’t Scan System Files/Folders is checked. In fact, you may want to click the Scan Location tab and explicitly tell the program only to look in the folders where you keep your documents, photos, and so on.
When you’re ready, click the Scan Now button.
After the scan to complete, go to the Duplicate Files tab and click the Selection Assistant icon (it’s the one with the magic wand) and select Mark>Select by Group>All but one file in each group.

Once the program has made all of the selections, click the File Removal button and decide how you want the files disposed.
Reference ;
forums.pcworld.com, pcworld.com, discussions.apple.com, duplicatefilesdeleter.com
Thanks, If you like this tutorial please share this article to your friends in FB, Twitter,
Related Posts


About The Author
AYYU
I am a blogger since 2010 and I’m the author of this website I'm a systems/network administrator and I enjoy solving complex problems and learning as much as I can about new technologies. I write tutorials based on my work experience and other IT stuff I find interesting. since 2006 in online world also I am a troubleshooter for the well-known website like http://www.fixya.com and many more groups